


Tablets, especially the iPad, play a significant role in today’s digital environment, and even more so if we focus on the rich Apple ecosystem. They have established themselves as important tools for both professional and personal endeavors. For newcomers or those evaluating its utility, navigating the iPad’s features, setting it up, and knowing what it has to offer are priorities. This guide will show you how to set up an iPad for the first time and offers other practical tips for efficient use if you are familiar with the tablet. Let’s get started!
Table of contents
- Understanding iPadOS
- How to turn the iPad on and off
- How to navigate the automatic setup of iPadOS
- How to charge your iPad
- How to create an Apple ID
- How to use the Home button
- How to use Control Center
- How to use the Settings app
- How to turn WiFi on or off
- How to install an app
- How to update iPadOS
- Conclusion
Understanding iPadOS
The iPad’s performance and versatility are due in part to its operating system, the iPadOS. Though it shares foundational elements with iOS (used in iPhones), the iPadOS is distinctively tailored for tablets. Here’s a breakdown:
- Multitasking capabilities: iPadOS supports advanced multitasking. Users can open and operate multiple apps simultaneously using Split View and Slide Over, which are suitable for the expanded screen real estate.
- Apple Pencil integration: For compatible iPads, iPadOS provides full support for Apple Pencil. This feature is vital for tasks such as note-taking, document markup, and drawing.
- Files app: The Files app on the iPadOS streamlines document management. It allows for efficient organization, access, and search functions akin to desktop operations.
- Desktop-class browsing: Safari in iPadOS is designed for a browsing experience comparable to desktop computers, ensuring websites render appropriately and aren’t limited to mobile views.
- External drive support: iPadOS users can connect external drives, SD cards, and USB drives directly to their devices, facilitating expanded storage and easy file transfers.
- Customizable home and lock screens: The home and lock screen customization feature allows users to integrate widgets, offering immediate access to essential app information.
- Gesture navigation: Beyond traditional touch commands, iPadOS introduces a suite of gestures for faster and more intuitive system navigation.
- Interactive widgets: You can perform easy and quick actions directly from the widgets, such as playing music, answering a message, adding a reminder, or making a call.
To fully benefit from the iPadOS, you should have the latest version, which is currently the iPadOS 17, with a release date of September 2023. Apple releases new versions of iPadOS every year with added features, enhancements, and important security and compatibility updates.
👉 Learn more: How Long Do iPads Last?

How to turn the iPad on and off
Here’s how you can turn the different models of the iPad on and off:
Turning the iPad on
- Locate the power button: Depending on your iPad model, it’s either on the top right edge or the upper right side.
- Press and hold: Hold the power button for a few seconds until you see the Apple logo. The device will then continue the start-up process.
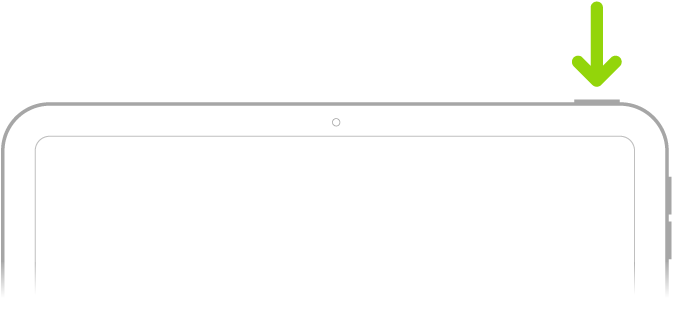
Image credit: Apple
Turning the iPad off
- Locate the power button: As before, find the button on the top right edge or the upper right side.
- Press and hold: Keep holding the power button until the “slide to power off” slider appears.
- Slide to power off: Move the slider to the right, and the screen will turn off, indicating the device is powered down.
Turning the iPad off on newer iPads without a Home button
For newer iPad models without a Home button, press and hold both the power button and one of the volume buttons to access the “slide to power off” slider.
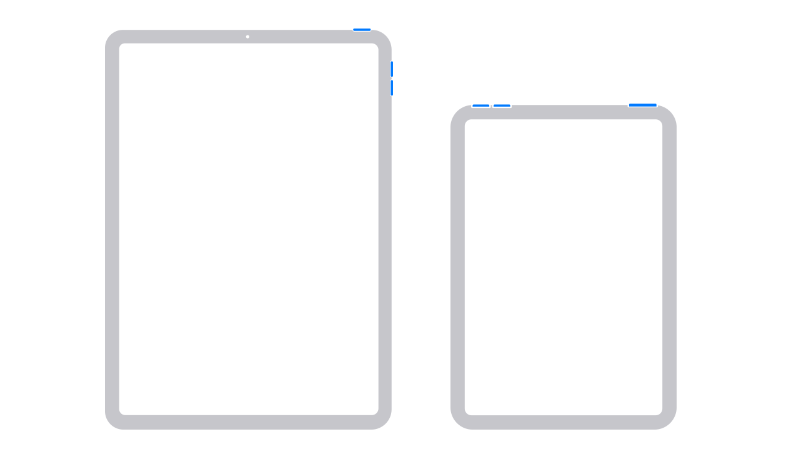
Image credit: Apple
These are the iPads that don’t have a Home button:
- iPad 10 and later
- iPad Air 4 and later
- iPad Pro 11-inch (3rd generation and later)
- iPad Pro 12.9-inch (3rd generation and later)
- iPad mini 6 and later
It’s a good practice to power off your iPad from time to time, as restarting can often resolve minor software hiccups.
👉 Learn more: Every iPad Size Compared: Which Is Best for You?
How to navigate the automatic setup of iPadOS
Setting up your iPad involves a sequence of steps to ensure optimal operation and personalized settings. You can follow these steps:
- Turn on the iPad: Press and hold the power button until the Apple logo appears. Await the “Hello” screen.
- Select your language and region: From the provided lists, choose your preferred language and geographical location.
- Choose a Wi-Fi network: Select your preferred Wi-Fi network and enter the password when prompted to connect.
- Set up Face ID or Touch ID: Depending on your iPad model, follow on-screen instructions to set up facial recognition (Face ID) or fingerprint authentication (Touch ID).
- Create or log in to Apple ID: Sign in with your existing Apple ID. If you don’t have one, you’ll be prompted to create it. This ID allows access to Apple services like iCloud and the App Store.
- Set up Siri: Activate Siri, Apple’s voice assistant, by following on-screen prompts. This typically involves speaking specific phrases for voice recognition.
- Determine data and privacy settings: You’ll be offered choices regarding settings like location services. Adjust based on your preferences.
- Select display settings: Choose how content appears on your screen by opting for a standard or zoomed display view.
- Set up Apple Pay: For those wishing to use Apple Pay, this step involves adding your credit or debit card details.
- Adjust other iPad settings: Make final settings choices, such as deciding on app analytics sharing, turning on or off True Tone display, and selecting your preferred appearance (light or dark mode).
How to charge your iPad
Ensuring that your tablet remains charged is fundamental for uninterrupted use. Charging it correctly can also contribute to your iPad’s longevity. Here’s a clear guide on how to effectively charge your iPad:
- Locate the charging port: Depending on the iPad model, it will either have a Lightning port (commonly found on older models) or a USB-C port (found on some newer models like the iPad Pro).
- Use the correct cable: Always use an Apple-certified charging cable that matches your iPad’s port (either Lightning to USB or USB-C to USB-C). Third-party cables might not meet Apple’s safety or performance standards.
- Connect to a power source
- Wall outlet: Using the Apple-provided wall adapter, plug one end of your charging cable into the adapter and the other end into your iPad. Plug the adapter into a wall outlet.
- Computer: If charging via a computer, ensure it’s turned on and not in sleep mode. Connect your iPad using the appropriate cable to the computer’s USB port. Note that charging via this method might be slower than using a wall outlet.
- Other sources: You can also use certified external batteries or power banks. Connect your iPad to the power bank using the appropriate cable.
Your iPad’s remaining battery will be indicated in a small bar at the top right of the screen. If you go to the Settings app > Battery > Battery Percentage, you can also choose to show a percentage next to this bar.
👉 Learn more: How to Save Battery on iPad: 30 Easy Tips
How to create an Apple ID
An Apple ID is a fancy way to define a username and a password. It’s essential in your iPad experience since it’s not only your identity on the device but a gateway to many other Apple services, like iCloud, App Store, and built-in apps. As we’ve seen before, the iPad setup can guide you through creating an Apple ID in no time.
How to use the Home button
For years, Apple’s iconic Home button sat below the screen on iPhones and iPads, serving as the navigational linchpin. With a single press, users could instantly return to the familiar grid of app icons on the Home screen. Need to shuffle between apps? A swift double-press showcased thumbnails of recently used applications, while a slide to the right offered a glimpse into the Control Center’s utilities.
Beyond quick navigation, the Home button had another ace up its sleeve: Siri, Apple’s voice assistant. A prolonged press brought Siri to life, ready to answer queries or carry out commands.
However, it’s essential to note that as technology evolved, so did Apple’s design philosophy. The newest models have phased out the Home button in favor of gesture-based controls and screen real estate, reshaping user interaction with their devices. Still, for many, the Home button remains a cherished facet of Apple’s user-centric approach.
How to use Control Center
The Control Center users a centralized hub for quick adjustments and frequently used controls, avoiding going deep into the Settings app or other individual applications.
Accessing the Control Center is easy. For devices with a Home button, a double press will reveal it on the right side. Alternatively, swiping up from the bottom edge of the screen serves the same purpose.
Once inside, users are greeted by an array of buttons and sliders designed for intuitive adjustments. Want to dim your screen for nighttime reading or pump up the volume for your favorite song? The Control Center has you covered.
But that’s not all. If you’ve just unlocked your iPad, a glance to the left will show the four most recently opened apps, offering swift re-entry to ongoing tasks or leisurely pursuits.
How to use the Settings app
Upon opening the Settings app, users are greeted by a structured list of options ranging from core system configurations, like “Display & Brightness” and “Sounds & Haptics,” to settings specific to individual apps installed on the device.
As your iPad becomes more integral to daily tasks and entertainment, the Settings app will be the go-to place for ensuring the device operates precisely how you want it to.
Apple’s Settings app is the command center for personalizing, securing, and optimizing your iPad. It’s more than just a place to adjust brightness or connect to Wi-Fi; it’s where the iPad’s functionality and user experience can be meticulously tailored to meet individual preferences and needs.
Key functionalities include:
- Wi-Fi and Cellular: Connect to networks, manage data usage, and set up VPNs.
- Notifications: Customize which apps can send you alerts and how they appear.
- Privacy: Manage permissions for apps to access data like location, photos, and contacts.
- General: Update software, manage storage, reset the device, and more.
- Display & Brightness: Adjust screen brightness, text size, and select light or dark mode.
- Battery: Monitor battery health and optimize for longer life.
- Accessibility: Tailor the iPad’s interface for users with specific needs, including visual or auditory adjustments.
How to turn WiFi on or off
Here’s how to manage your Wi-Fi settings on an iPad:
Via the Settings App:
- Open the Settings app: Look for the gear-shaped icon, typically located on your Home screen.
- Tap on ‘Wi-Fi’: It’s usually near the top of the list on the left-hand side.
- Toggle the switch: At the top of the Wi-Fi settings, you’ll see a switch. If it’s green, Wi-Fi is on. Tap the switch to turn it off. Tap again to turn it back on.
Via the Control Center:
- Access the Control Center: If your iPad has a Home button, double-press it. For newer models without a Home button, swipe down from the top-right corner of the screen.
- Locate the Wi-Fi icon: It looks like a radio wave or a dot with curved lines radiating out.
- Tap the icon: A blue icon indicates Wi-Fi is on. If it’s gray, Wi-Fi is off. Tap to toggle between the two states.
How to install an app
Applications, or apps, are the lifeblood of modern tablets, offering tools, entertainment, and functionalities that enrich our digital experiences. If you’re looking to add a new app to your iPad, the process is straightforward. Here’s a step-by-step guide:
- Open the App Store: Locate the blue icon with a white capital ‘A’ made of pencil, brush, and ruler sticks, typically on your Home screen, and tap it.
- Use the search function: At the bottom of the App Store, you’ll find a magnifying glass icon labeled Search. Tap on it and then type the name of the app or a keyword related to what you’re seeking in the search bar at the top.
- Select the desired app: Browse through the search results and tap on the app you wish to install. This action will lead you to the app’s specific page, where you can view details, ratings, and reviews.
- Tap Get or the price: Free apps will display a Get button, while paid apps show their price. Tap accordingly. If it’s a paid app, ensure you’ve set up your Apple ID with a payment method.
- Authenticate your purchase: Depending on your security settings, you may be prompted to enter your Apple ID password, use Touch ID, or use Face ID. Complete the authentication to proceed.
- Wait for the download: Once authorized, the app will start downloading. You’ll notice a circular progress indicator on the app icon on your Home screen. Once it’s filled, the app is installed and ready to use.
- Open your new app: Navigate to your Home screen and locate the app icon. Tap it to launch and begin using your newly installed application.
👉 Learn more: 20 Best Apps for Your iPad in 2024
![]()
How to update iPadOS
Keeping your iPad’s operating system (iPadOS) up-to-date ensures you benefit from the latest features, performance improvements, and security patches. Apple frequently releases updates to iOS, and installing them is a straightforward process. Here’s a guide to help you seamlessly update your device:
- Ensure a backup: Always back up your iPad to iCloud or a computer before updating. This step protects your data if anything unexpected occurs during the update.
- Connect to Wi-Fi: A stable Wi-Fi connection is required to download updates. Ensure your iPad is connected to a reliable network.
- Plug into power: To avoid interruptions due to a low battery, plug your iPad into a charger during the update process.
- Access settings: Find and tap the gear-shaped Settings icon on your Home screen.
- Navigate to software update: Within Settings, tap General and then Software Update.
- Check for updates: Your device will automatically search for available updates. If one is found, its details will be displayed.
- Tap Download and Install: When an update is available, tap this option to begin. Some updates also offer an Install Tonight option, which will perform the update overnight.
- Authenticate the update: Depending on your settings, you may need to enter your device’s passcode to proceed.
- Wait for the update: Your iPad will download the update first and then restart to complete the installation. It’s crucial to keep your iPad powered on during this phase.
- Complete the installation: Once restarted, you might encounter additional prompts related to the new update. Follow any on-screen instructions to finish.
Consistently updating iOS is a recommended practice. It ensures that you leverage the full potential of your device and stay protected with the latest security enhancements. The most recent version is the iPadOS 17.
Conclusion
Throughout this guide, we’ve covered the foundational elements of setting up and navigating your iPad. For those who are new to the Apple ecosystem or just looking for a refresher, we hope this has been an insightful journey.
If you want to buy an iPad but do not want to compromise on the features based on budget restrictions, refurbished iPads are the option for you, especially if this is your first product from Apple.
A refurbished device is a product that was either pre-owned or used as a display model, returned to working condition by professional refurbishers, and sold for a reduced price with a professional warranty. A refurbished iPad works the same as a brand-new iPad.
Compare all refurbished iPads available in real time below on RefurbMe. 👇

32GB storage
Space Gray
2017 release

32GB storage
Space Gray
2018 release

32GB storage
Silver
2017 release
Remember that Apple itself refurbishes its products, including the iPads. You can learn more about the Apple Certified Refurbished program and why it matters. In case you need further information and help with using your new tablet, you can find Apple’s manuals for the iPad here.
Happy buying! 🛍️
Last updated: Apr 7, 2025 · First published: Apr 19, 2024


